Epson XP 960 Driver
Published:
November 19th, 2022
Updated:
November 19th, 2022
Developer:
Version:
2022
Platform:
Epson XP 960 Driver Windows 32-bit/64-bit
Table of Contents
How to Install the Epson XP 960 Driver?
Having the Epson XP 960 Driver installed on your computer is one of the most important steps you can take to make sure your printer works properly. If you are unsure whether you have the correct driver, there are several methods that you can try. You can try to print from a desktop computer, phone or tablet computer, or even a CD or DVD. In addition to this, you can also reset the printer to its factory settings.
Installing the driver:
During the installation process, you may experience some issues that may require you to restart your computer. This can clear any cookies and caches that may be stored on your computer. Afterward, you can install the Epson XP 960 driver.
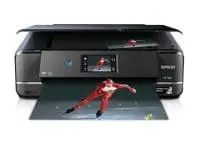
The Epson XP 960 is a printer that can print photos and files. It comes with automatic duplexing, cropping, rotating, and double-sided printing features. It can also print CD/DVD labels. So, it has a maximum document size of 8.5 x 14 inches. You can also print multiple photos on a single page.
So, you must first connect the printer to your PC or Mac. You will need a power cable and an Ethernet cable. Also, you will need ink cartridges. If you have installed cartridges, then the printer will automatically start.
Printing from a phone or tablet computer:
XP 960 is a wireless wide-format small-in-one printer that can be used with any smart device. It has built-in card slots and supports specialty paper. So, it has a 4.3-inch touchscreen display for easy navigation. It can print from a USB key, memory card, or directly from a disc. It also has Wi-Fi and Ethernet capabilities.
The Epson XP 960 offers high-quality printing, including borderless photos. The printer can print in color or black and white. It also supports a variety of paper sizes, including 5″ x 7″, 3.5″ x 5″, 4″ x 6″, A3-sized photo media, and specialty paper.
Epson XP 960 has a dedicated photo tray that can hold up to 100 sheets of paper. It also has a CD/DVD tray that can hold inkjet printable CDs.
Scanning to a phone or tablet computer:
Using Epson XP 960 Driver with a phone or tablet computer, you can scan documents or photos and print them. The device offers wireless connectivity and a touchscreen display. It also supports advanced print options such as double-sided printing, image capture, and resizing of scanned images. You can also print to a disc directly from a USB key.
You can also use the Scan to Computer feature to scan documents to your PC. This feature is supported on Windows 8, Windows 7, and Windows Vista. If you don’t want to scan to your PC, you can also save scanned files to your Mac or iPad. You can also email scanned documents to anyone and send them as PDF files.
Printing to a CD/DVD:
Whether you’re printing on photo paper or a CD/DVD, you can be sure that your Epson XP 960 will produce stunning results. This all-in-one printer uses inkjet technology to produce quality photographs that are professional and grain free. In addition to printing, the all-in-one printer offers the features you need for wireless printing.
The Epson XP 960 all-in-one printer offers the ultimate in wireless printing. It is equipped with a built-in scanner and an auto-extend paper tray. It can also be used as a standalone photocopy machine, which is ideal for quick document copying. In addition to this, the printer is also compatible with specialty paper.
If you want to print on CD or DVD, you’ll need to install the Epson XP 960 driver. The driver is available for download on the Epson website. After downloading the driver, it can be installed on your computer.
Resetting the printer to factory settings:
Performing a reset on your Epson XP 960 printer to factory settings can solve many issues and get your printer back on track. There are some things to consider, though.
To perform a factory reset, you should first unplug your printer from your computer. You should then wait for a couple of minutes before plugging it back in. You may also need to turn your PC on.
To complete the factory reset, you will need to use a one-time reset key. You can find one on the back of your printer. Once you have the key, you should then open the home menu by pressing the “Home” button. This will open the menu that allows you to select the “Restore Default Settings” option.